Saturday, October 15, 2011

Leading Frogs and Salamanders to the Tunnel

In addition to describing the installation of the tunnel, we would like to explain how we set up fences to guide amphibians to the tunnel entrances.
There are lots of different types of fencing materials to choose from: cement, wood, metal, plastic mesh, PVC or Big O pipe cut in half, landscape cloth, etc. ACO Systems Ltd even makes a specially designed fence product for amphibians (http://www.acousa.com/wildlife/index.htm).
For now, we decided to stick with the clear plastic sheeting (6-mil polyethylene) that we have used for roadside barriers. We knew it would successfully block Red-legged Frogs, Northwestern Salamanders, Rough-skinned Newts and Western Red-backed Salamanders. Pacific Treefrogs can climb over it, but they seem to be able to climb everything!  

The clear 6-mil polyethylene lasts a long time in the shade (our roadside fences have lasted six years), and it’s inexpensive. We decided to keep our investment low until we see how well the new tunnel works.
We cut pieces that were 50 cm tall and attached them to wooden stakes with duct tape and thumbtacks. We dug the lower edge of the plastic 10 cm under the soil so that salamanders and frogs could not burrow beneath it.
It is important to position fences on angles that direct animals toward the tunnel entrance, rather than placing them perpendicular to the direction that amphibians are travelling. We angled fencing at 20 to 45 degrees from the edge of the road into the forest for up to 60 m.
The topography was uneven so it was a challenge to keep the fence taut. We chose the path of least resistance, but still needed to cut away a few logs and several small roots. We piled soil up on top of the plastic in places where we could not bury it under large roots.

Connecting the plastic to the tunnel entrance was easy because the box culvert has straight vertical walls. It also helped to have a thick layer of dirt on the floor of the tunnel. We extended each plastic fence about 1 metre into the tunnel, dug it into the dirt, and held it against the wall and ceiling with wooden stakes and wire. This created a smooth transition from plastic to concrete wall.

We are monitoring amphibian movements along the fences and through the tunnel this fall. Our next post will describe our monitoring techniques and some of the results to-date. 

Tuesday, May 10, 2011

Installation Completed!

The second half of the tunnel was put in place last Wednesday and repaving happened today. Here are some more photos to demonstrate how smoothly the whole process went.

May 4, 8:00 AM:  The excavator uncovered some large pieces of wood only about 0.5 m deep in the road bed on the west side.

Fortunately, the deeper material was good and gravelly.

9:00 AM:  The base was compacted quickly after adding crush and checking the height.

Two and a half more sections of culvert were lifted into place to complete the 13.4-m tunnel.

The most gruelling part of the job - filling the inside of each section with substrate 0.3 m deep to make the interior of the tunnel level with the ditch.

12:30 PM:  Several truck loads of "pit run" delivered to cover the culvert.  Loads came quickly one after another from a quarry just a few hundred metres from the site.

14:00 PM:  Substrate at the entrance of the tunnel was compacted and sloped away to prevent water from pooling inside. 

15:00 PM:  Compacting the road surface so it could be left until the repaving crew arrived.

10 May, 9:00 AM:  A paving crew arrived from Nanaimo to do our job as well as some others on the west coast.


The first layer of asphalt applied smoothly over the prepared surface. 

Torching the first layer to dry it before applying the next.

12:00 PM: Finishing the second layer.

12:15 PM:  Installation Completed! We'd like to express a huge thank you to Simon Stubbs, Ministry of Transportation & Infrastructure, for overseeing the installation. Simon, you rock!!! More thanks to come in our next post.


Tuesday, May 3, 2011

Day One of the Tunnel Installation

One half of the amphibian tunnel was installed today!! These pictures tell the story:

7:15 AM: Safety meeting with the site safety coordinator .

7:30 AM: Setting out safety cones and signage.

7:35 AM: Laying out lines for the trench.

7:55 AM: Rock-hammer punching through the pavement along the lines. 
A red squirrel come running out of the forest to perch, inquisitively, on the roadside fence. Rock-hammers do sound somewhat like a the trill of a squirrel, only much louder!

9:00 AM: Excavating the top layer of pavement before digging the trench.

Carefully making the trench size match the layout.

10:00 AM:  Adding crushed gravel over the bottom of the trench.

A hydraulic hoe-packer compacting the "crush" before it is raked smooth.

Making sure the base is at the right level.

12:30 PM:  Loading the trailer with culvert pieces that had been stored at a nearby gravel yard.

Delivering the culvert pieces to where the crane waited to lift them into the trench.

Each piece weighs over 19,100 pounds or 8.6 tonnes.

Lining the first piece up on the centre line of the highway.

 
Filling each culvert piece with natural substrate, slid down the board to the back end.

Natural substrate is a mix of soil from the forest floor (called "overburden" in the quarry industry) and crushed gravel.

Downed wood and litter placed on top of substrate in each section.

Lifting in the second section of culvert.

Lining the sections up to fit snuggly. 
No gasket or seal was needed because the culvert will not carry water.

13:50 PM: Lifting in the third section of culvert.

Adding and compacting "crush" around the box culvert.

16:15 PM: Culvert fully buried to the shoulder. Rip rap will be added tomorrow.

16:30 PM: Metal plate laid over top makes it secure to drive over.

Sure hope the frogs and salamanders will like it!


Friday, March 25, 2011

The Arrival of the Tunnel

Today, we’re celebrating the arrival of a six-pack of large concrete tunnel pieces that are intended to become a well-used passageway for frogs and salamanders under Highway 4.

Langley Concrete and Tile Ltd cast the box-shaped structures that will fit together to form a 13.5-m long tunnel under the highway.  There are five and a half pieces to join. Each full piece measures 2.2 m wide, 1.3 m tall and 2.4 m long, and weighs over 7 tonnes. The sixth piece is half the length and weight of the others.

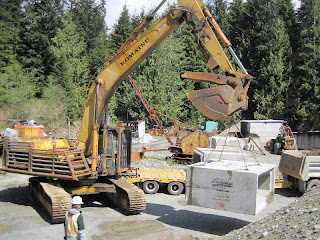
It took a mighty machine and skilled operators to lift the pieces off the B-train transport truck. Using chains and specialized hooks, called “clutches”, a front-end loader carefully moved each piece to where it will be stored until installation happens later this spring.

“Why concrete?” you ask. Indeed, it is heavier and more expensive to make and move than plastic or metal. It has advantages, though, when it comes to providing a spacious passageway under a shallow road-bed. Concrete is strong enough to hold up traffic (literally!) with only a small amount of material covering it to the road surface.

While the transport driver watched the off-loading, he described his step-daughter’s excitement about him delivering a tunnel for frogs. “She loves collecting frogs, identifying them and writing about them in her journal”, he said. A budding herpetologist, no doubt. We invited him to bring her along next September to see the frog migration and the new tunnel in action.